Tuesday, May 05, 2026
sandboxing
Wednesday, May 14, 2025
Tesla, Ed Gray and just what they were doing.

Labels: Ed Grey, high voltage pulsed DC, Tesla
Thursday, October 17, 2024
what I have learned so far
so, it is time to share what I have figured out with physics.
after I finished writing this I read it. and it is a mess, like I tried to put an entire book in one paragraph... sorry, I will try to clean it up. and it kind of looks like I have lost my mind entirely, I just hope I have shared enough to at least show you why I think what I do... Based on comments I will cover bits of it in more detail as others want or as I can figure out better ways to do that or just to share more details of tests that lead me to these ideas.
-----------------------
anyone seen the idea that someone figures out every so often using 2 magnetic coils pointed at each other ? you turn them on at the same time and one of them off before the other.

I used rebar in between the coils, air core versions did not work for me, so we are having magnetic spins in the iron do interesting things. but anyway, it does make reactionless thrust, not much, but it is there and measurable. I built a few versions of this and they all work.

even a rotary version with an iron cube as a core worked. It is driven with magnetic coils on 2 axis to make a rotating field and a stack of N45 magnets are on the 3rd axis.

this one uses just magnets that are on a disk that is spun by a motor. with one magnet at 90 degrees that you can see stuck to the C clamp in the picture. you can even put the entire thing in a box and it still works just fine.
now the odd thing is someone suggested that I try not just the coils them selves, but also try and see if it moved nearby items. so I tried that, I used a ceramic coffee mug hanging from a string, and it moved as well. I was quite surprised by this.
so this version was built to see if the iron was really needed. this version was made with no iron core, it is 2 special capacitors separated by a distance. the plates are set so when you discharge it there is a net magnetic field.

this is the template with aluminum foil capacitor plate put down opposite directions.
so, you take 2 capacitors made with parts shown and put them in line, and separate them by some distance. I used about 5/8inch distance, then I connected them in parallel and used longer wires to connect one of them for a phase delay. they were charged to a high voltage and discharge using a spark gap (because it is really fast), and the resulting field moved PLA plastic parts suspended from the ceiling.
further efforts to try things like St. Clair patents that were quite similar failed (US20030209636A1). so this is kind of where I am stuck on this path.
another reactionless thrust device was built by Richard Banduric.
go read his book, get it here https://www.researchgate.net/profile/Richard-Banduric
anyway, I built the capacitor with one plate that spins, and it works just like he says it does. but yet again it is low thrust out.
now think about these two reactionless thrust devices and watch the first part of this video.
https://www.youtube.com/watch?v=aXRTczANuIs
the part where you have a near field that is quite different than the far field.
there are a few ways to look at this all, one of my favorite is to dump relativity space time thing and just move everything to a time field. and I mostly say this because if you set up a time gradient detector, you can see that things like moving electrostatic fields will alter the flow rate of time. and in this case, gravity is caused by the time field gradient. but standard math also shows how it works and Richard Banduric shows us.
working out how to make this effect much larger is a bit of an issue. The one thing I was trying to do is to use a central vertical magnetic field to trap electrons in orbit, and then horizontal magnetic coils set up just like a 2 phase AC motor, the entire thing is cone shaped. so you end up with basically an open air cyclotron. one plate of the half spinning capacitor is the electron cloud, and the other will be the windings of the vertical magnetic field. and the cone shape will let the forces lift it up. I like the idea, but it is really hard to build.
so there are easier ways to get the thrust. an asymmetrical electrostatic field will also do it. http://jnaudin.free.fr/html/2dacap.htm and these people seem to have figured out the details of how to build it pretty well https://ivolimited.us/#ZeroFuel or read the patent they made (if you can find it, I can't)
so, anyway, I am looking for engineering solutions as to make these forces stronger, so sharing all this with everyone. maybe someone out there can figure it out.
--------------------------------------------
so, next, what reality is made of, or at least as close as we can get right now.
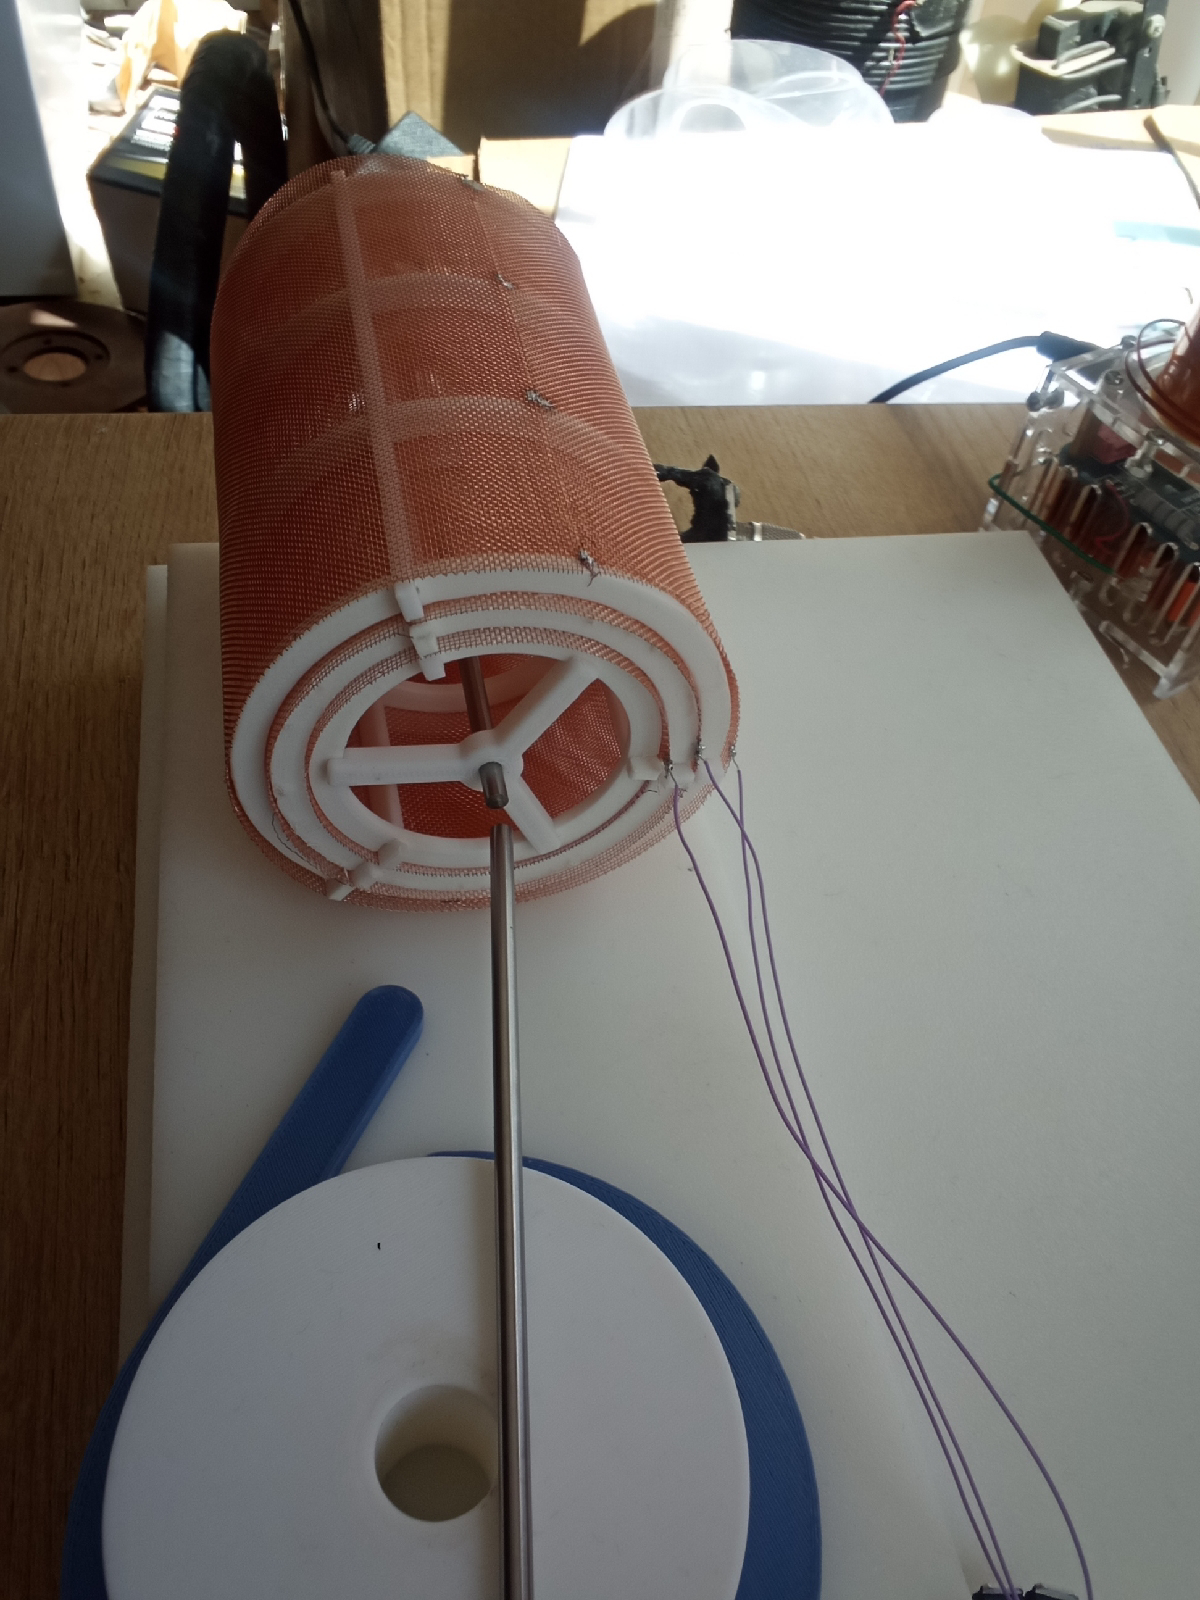
if you take insulated copper wire and wind it into a skinny long coil, then take that coil and wind it into another coil (the same helix direction), then take that and make a single turn coil. if you do this with a height to thickness ratio of 4 to 1 and you keep an even number of turns on each level, it makes something fascinating. my coil was 2 inches across and 1/2 inch thick with 24 turns to make each tiny coil and 24 turns to make up the larger coil...

this coil had been dropped, they need to be quite accurate to work.
now when powered up with alternating current it made a stable electromagnetic item that persisted after the power was turned off and the physical coil removed from the location. it worked regardless of the frequency I used, anything from 60Hz to 7.2MHz where I tested it.
the idea of this coil came from Bob Greenyer. there is much detail about this on his site https://remoteview.substack.com/p/the-bagel-game download the bagel game PDF and look at the rest of his site.
and now for the odd thing, the left hand helix wound coil appeared to make electromagnetic items that had an overall negative charge. so now I could see how this sort of electromagnetic shape (or similar shape structures based on that idea) can build matter. now we have a matter of frequency. if 2 of these things are at the same frequency they will interact, but if they are not at the same frequency they could pass through each other and never notice each other. this gives rise to how there may be "other dimensions" hiding from us, all right over the same physical space.
this would show the location all the astral realms and the rest of what psychics see. biology and consciousness likely make use of all this.
and in other physics tests that I have run in dream worlds, it seems as if they are also made of the same thing as our world. and I noticed that the faster gravity is in a "realm" (or dimension or whatever we are calling this), the harder it is to get the dream control methods to work. so I suspect that what the shamans say about dreams being other places that are real might be true.
so something that should happen if this is true is that electric and magnetic forces are shared.
so I ran a test in a day dream, I built a device that would make measurable effects in our world, and it worked !
so my thinking is that others are living in all these other frequencies and that alien life has likely already figured this all out and has machines that can make use of it. so I bet if space aliens are real, they likely will show up to us as physical beings as well as how people of past eras called demons.
as far as safety,
most people I tell are not going to even try to use these ideas, most people lack motivation to do things 1/10 as hard. I give warnings when I find out what not to do. for example, the "bagel coil" (that is what people are calling this odd coil I just told you how to make) running at 7.2MHz for my tests burned me when they hit me days later after making them.
so I sort of doubt that many people will do any work on the idea anyway, and the few that do are very likely going to take the few warnings and proceed carefully
so, here are some details of the idea that might fill in the gaps.
the bagel coil fields can be left or right helix, they correspond to electrons and positrons.
the standard physics model has measured the smallest weight electrons, but they are by nature a fractal pattern, so you can keep adding energy into them. and being electrons they have very little mass. so you can move them with willpower. they can be made to do real work.
this appears to be the chi energy, the yin and yang. modern physics missed it by a narrow margin. and now that we know how this works, we can build devices to create or at least gather this energy. and yes, I have built a device that does this. and it works.
there are 10 bacteria types that directly eat these electron charge clusters, and other plants and animals do the same thing, after all, when it comes down to it, when you eat sugar, your body is really after that electron the sugar eventually gives up
bagel coil fields can be made with turbulence, electric arks etc... when the bagel coil fields collapses it can crush anything inside it. so table top fusion is quite possible. See Bob Greenyer information for details.
my goal here is to get the new ideas and hopefully working technology out there before civilization falls, that way the ones that rebuild things have a better chance at a good future than people do now.
and I get that this is not formatted well, and I can''t figure out how to format it well. at least not with the time I seem to have right now.
thank you to all my friends that came up with things to test and ideas to explore this reality we live in.
Labels: new physics, shaman realms
Wednesday, September 11, 2024
charge clusters from the sky
a dream showed me how to do this, and when I tried it, it worked !
biology is after the electrons, the sugar you eat is easy to extract this energy, but there are more direct methods. the electron is a fractal pattern, you can keep adding energy to them and they get bigger... so these electron charge clusters (ken sholders called them EVOs, everyone that finds them seem to call them by a new name) can be used as "food" for biology (they can also mess things up). 10 types of bacteria directly eat electrons, and at least the people I tried this with, humans seem to be able to do the same.
remember these are the same instructions to get hit by lightning... so, this is true mad science.
to do this, you need a high voltage hand held power supply (300KV limit, 3W of power), connect yourself to positive and point negative at about 45° up into the air. wear normal shoes, super insulating ones will hurt you, no shoes fails to work... standing on a plastic chair or stool also does well.

Labels: earth sky currents, electron charge clusters
Thursday, July 30, 2015
lithium battery pack
here is what it looks like all done

I got 8 LiPO4 10AH pouch cells
the manufacturing website http://www.bestgopower.com/battery-overview/pouch-cell.html
shipping cost almost $100 and took almost 2 months to get, so it is about $200 total
put them into a 4 cell pack that ends up 20AH at about 13V
I put power pole connectors on each set of 2 parallel cells,
made 2 matching connector sets, one puts them all in parallel in order to balance the voltage of the cells, I did not have to put an external connector on that one, but it will get me a 3.2V battery at 80AH and I do have a few things that will run on that low of voltage
I will likely need to use that connector at least every 6 charge cycles for cell balancing, but so far they are all at the same voltage with no drifting
the other connector puts them in series to get the 13V at 20AH to run most of my hardware and to charge them.

seems to work quite well
I charge them with solar (it limits the current by its nature) and use a DC to DC switcher to limit the charge voltage
http://www.amazon.com/DROK-Converter-1-2-32V-Laptop-Regulator/dp/B00C9UUFHC
have it set to float charge at 13.3V
the current solar is a 100W, but have a 20W one for portable use
so far I have been watching the voltage closely so I don't over discharge them,
over discharging these batteries will kill them forever almost instantly
but will soon will build a low voltage alarm so I don't mess them up
will set it to 12.9V with a delay to deal with transmit current on the radio dropping the battery voltage
as far as the physical mounting of them,
I left the clear plastic on the cells so that the cases are insulated (will help them not corrode)
I used 2 sided sticky foam tape to give them some space to expand if they need to

I took a circuit board and cut slots in it for the cells tabs to go through
you can see the poor solder joints through the tape I put to insulate connections (60W is not enough power to solder that large of wires to the cells )

I would likely never build this setup again,
quite hard to solder them and was worried about melting the plastic in them
and when I charge them I get radio interference, sounds like a loose connection,
so maybe I have a cold solder joint... or could just be the nature of the batteries
if I did it again, would get batteries that I can just bolt connections to, like these
http://www.electriccarpartscompany.com/-NEW-ENERGY-br-4000-CHARGE-CYCLES--20-AH_c_138.html
also don't have to worry about potential cell expansion with time like you have to with the pouch batteries
but maybe I should have just got something off this pace
http://www.electriccarpartscompany.com/-CUSTOM-12-VOLT-PACKS_c_182.html
overall I am happy with what I did,
the max continuous discharge is 60A with peak of 75A
that will more than double power my radio setup that I plan on running with it
will be adding an external box with fuses so the battery does not get hurt if I mess up,
but have not built it yet as it works now and I have been short on time
some motivations for wanting the lithium batteries is the potential life they have,
all my lead acid batteries are getting old, the lead acid batteries don't last that long anyway...
and the lithium are very light weight my setup is only 5 pounds
picked the LiPO4 over the Lithium ion because the voltage of the LiPO4 matches the radio hardware voltage requirements better than the lithium ion, and they likely have longer life, and tend not to light on fire randomly
my setup is lighter than premade options that I could have gone with
the other advantage i have is that I get perfect cell balancing.(with connecting them in parallel )
it is the least loss system for cell balancing I could find, and works even if I only charge to 80% (or whatever I prefer to charge to), most setups requite you charge to 100% for the cells to balance (because they shunt the extra voltage), and I kind of want the longer life of never charging past 90% (but still want the ability to go to 100% if I need to)
Wednesday, March 11, 2015
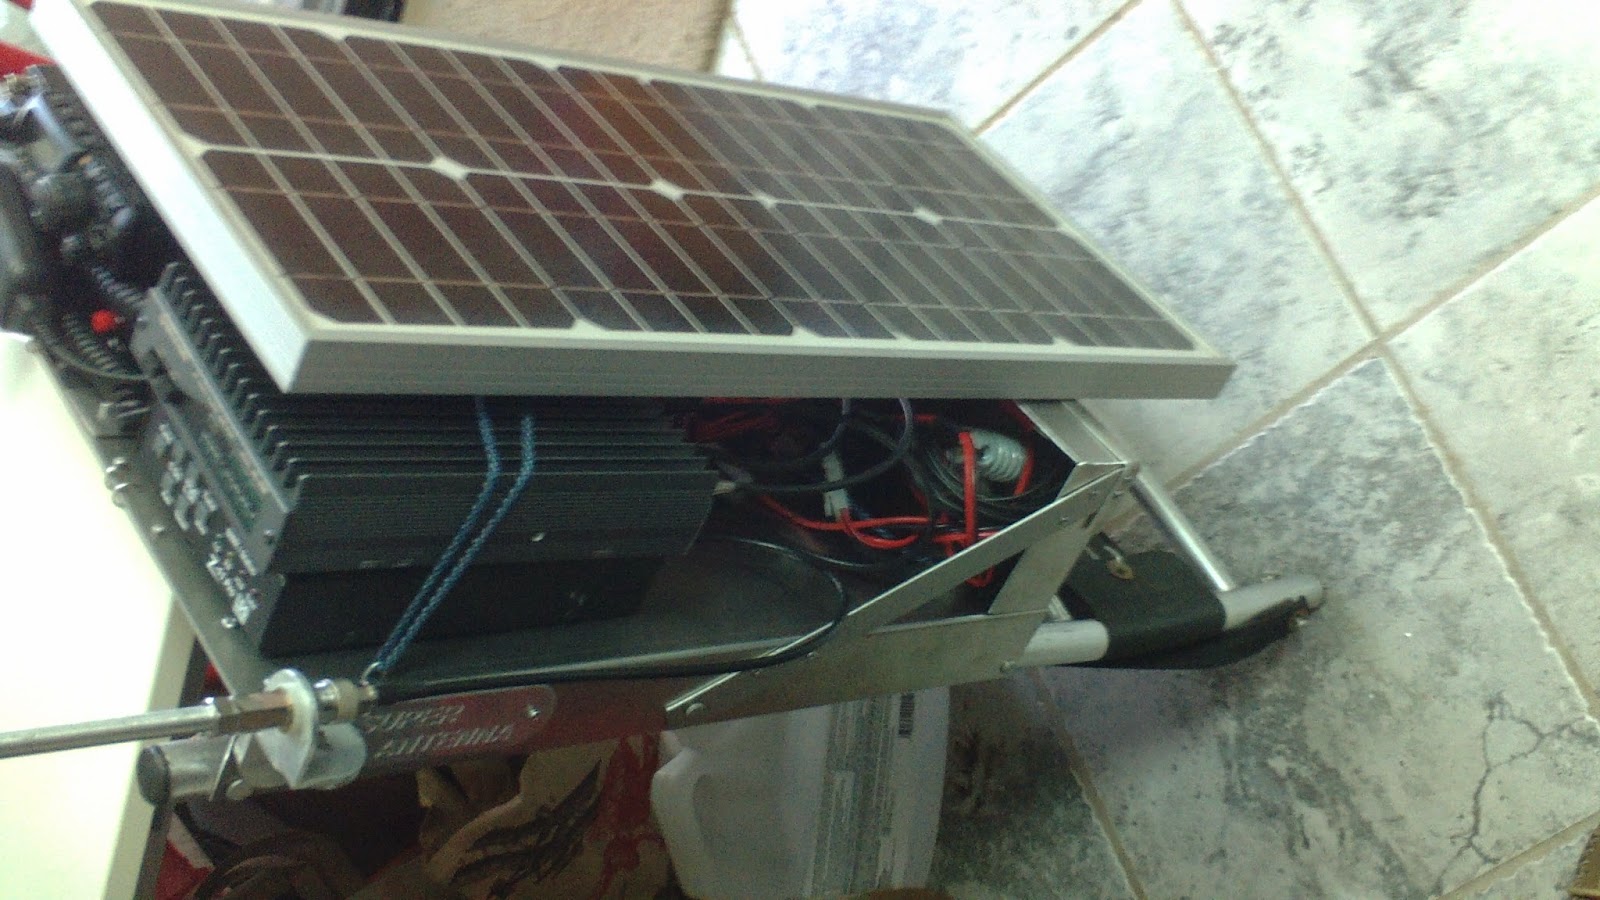
HF backpack radio

it is on an aluminum frame with an aluminum plate pinned on the back
I have a 20W solar panel on the back covering the hardware,
the radio hardware is
Yaesu FT-817
Tokyo Hy-Power HL45B
LDG Z-11pro
Mirage B-34-B
I have a super antenna mount mounted on the side of the pack
have the rest of the super antenna to use, but not sure if I will just use the hamsticks...
also have a 12AH 12V VRLA battery, and solar charge controller
this gets me all modes
45W on HF and
34W on VHF and
5W on UHF
all for 33 pounds, not so bad on a frame backpack
but I wanted more,
so I added my pelican case with my VX-7R and a few accessories like a lighter socket output that has a power pole connector so I can charge my mobile phone from the system, a few other small antennas, and that is about it.
I wanted the case on the back for 2 big reasons,
the setup stands up on it's own with the case attached,
and if it starts to get wet, I can put the radios, amps, tuner, and charge controller in the waterproof case (this is where I use to store them)
but it brings the total weight to 43 pounds, and that is a bit much for me to carry
I walked outside with it, found a few people talking on 40M, and called CQ for about 10 min. and got no reply, but it did appear to be working, it was a radio blackout time due to a solar flair (found that out later)
so band conditions were less than ideal, I will try again in a few days
the weight issue is a big deal
I am thinking I need to use the pelican case for something else at this point
and might remove the 2M amplifier, not that it is that heavy, but also not sure it is that safe to transmit 34W that close to me anyway, but mostly want it for SSB work, so it is not like it is constant output, but that may not matter, I just don't know
now it is picture time.
here is about what I started with, an old aluminum backpack frame and my radio hardware in a
pelican case


I wanted them to be easy to remove and not stick up high enough to hurt any of the hardware


Tuesday, April 29, 2014
water vapor
and it is not like I don't have the things to set it up,
so I put a dash of water in a canning jar, then vacuumed out all the air and some of the water (the water was boiling for a bit when I turned off the pump,
the lid to the jar self seals,
and I electrified it !
look for the arc inside the jar.
the vacuum pump is from harbor freight tools, they are used to fix air conditioners in cars,
the adapter to the canning jar is made by "food savers"
and the hand held tesla coil is Violux (and is very old and I could not find a thing about it on the internet )
